
Conda and Bioconda Tutorial: Install Bioinformatics Tools in Environments
Chapter 1 of 5: Why conda and Bioconda (Bioconda tutorial)
You found a tool in a paper. You try to install it. It needs Python 3.9, but your other tool needs Python 3.12. It needs a C library your laptop does not have. Two hours later, nothing runs and something that used to work is now broken. This is called dependency hell, and almost every bioinformatics student meets it in the first month.
This Bioconda tutorial fixes that problem for good. You will install conda through the Miniforge installer, connect it to conda-forge and Bioconda, and build separate environments for your tools. Then you will save each environment as a file so that you, your supervisor or a reviewer can rebuild exactly the same software later. Every command is real and explained flag by flag.
Choose your reading path
Click a path to choose. With no choice made, the whole page is shown. ▸ Go deeper sections open on click; 🔬 Researcher notes boxes give published evidence, tool defaults and pitfalls. Your choice is remembered on this device.
Chapters:
- Why conda and Bioconda
- Installing Miniforge and setting up Bioconda
- Creating and using environments
- The solver, environment files and reproducibility
- Troubleshooting, practice and next steps
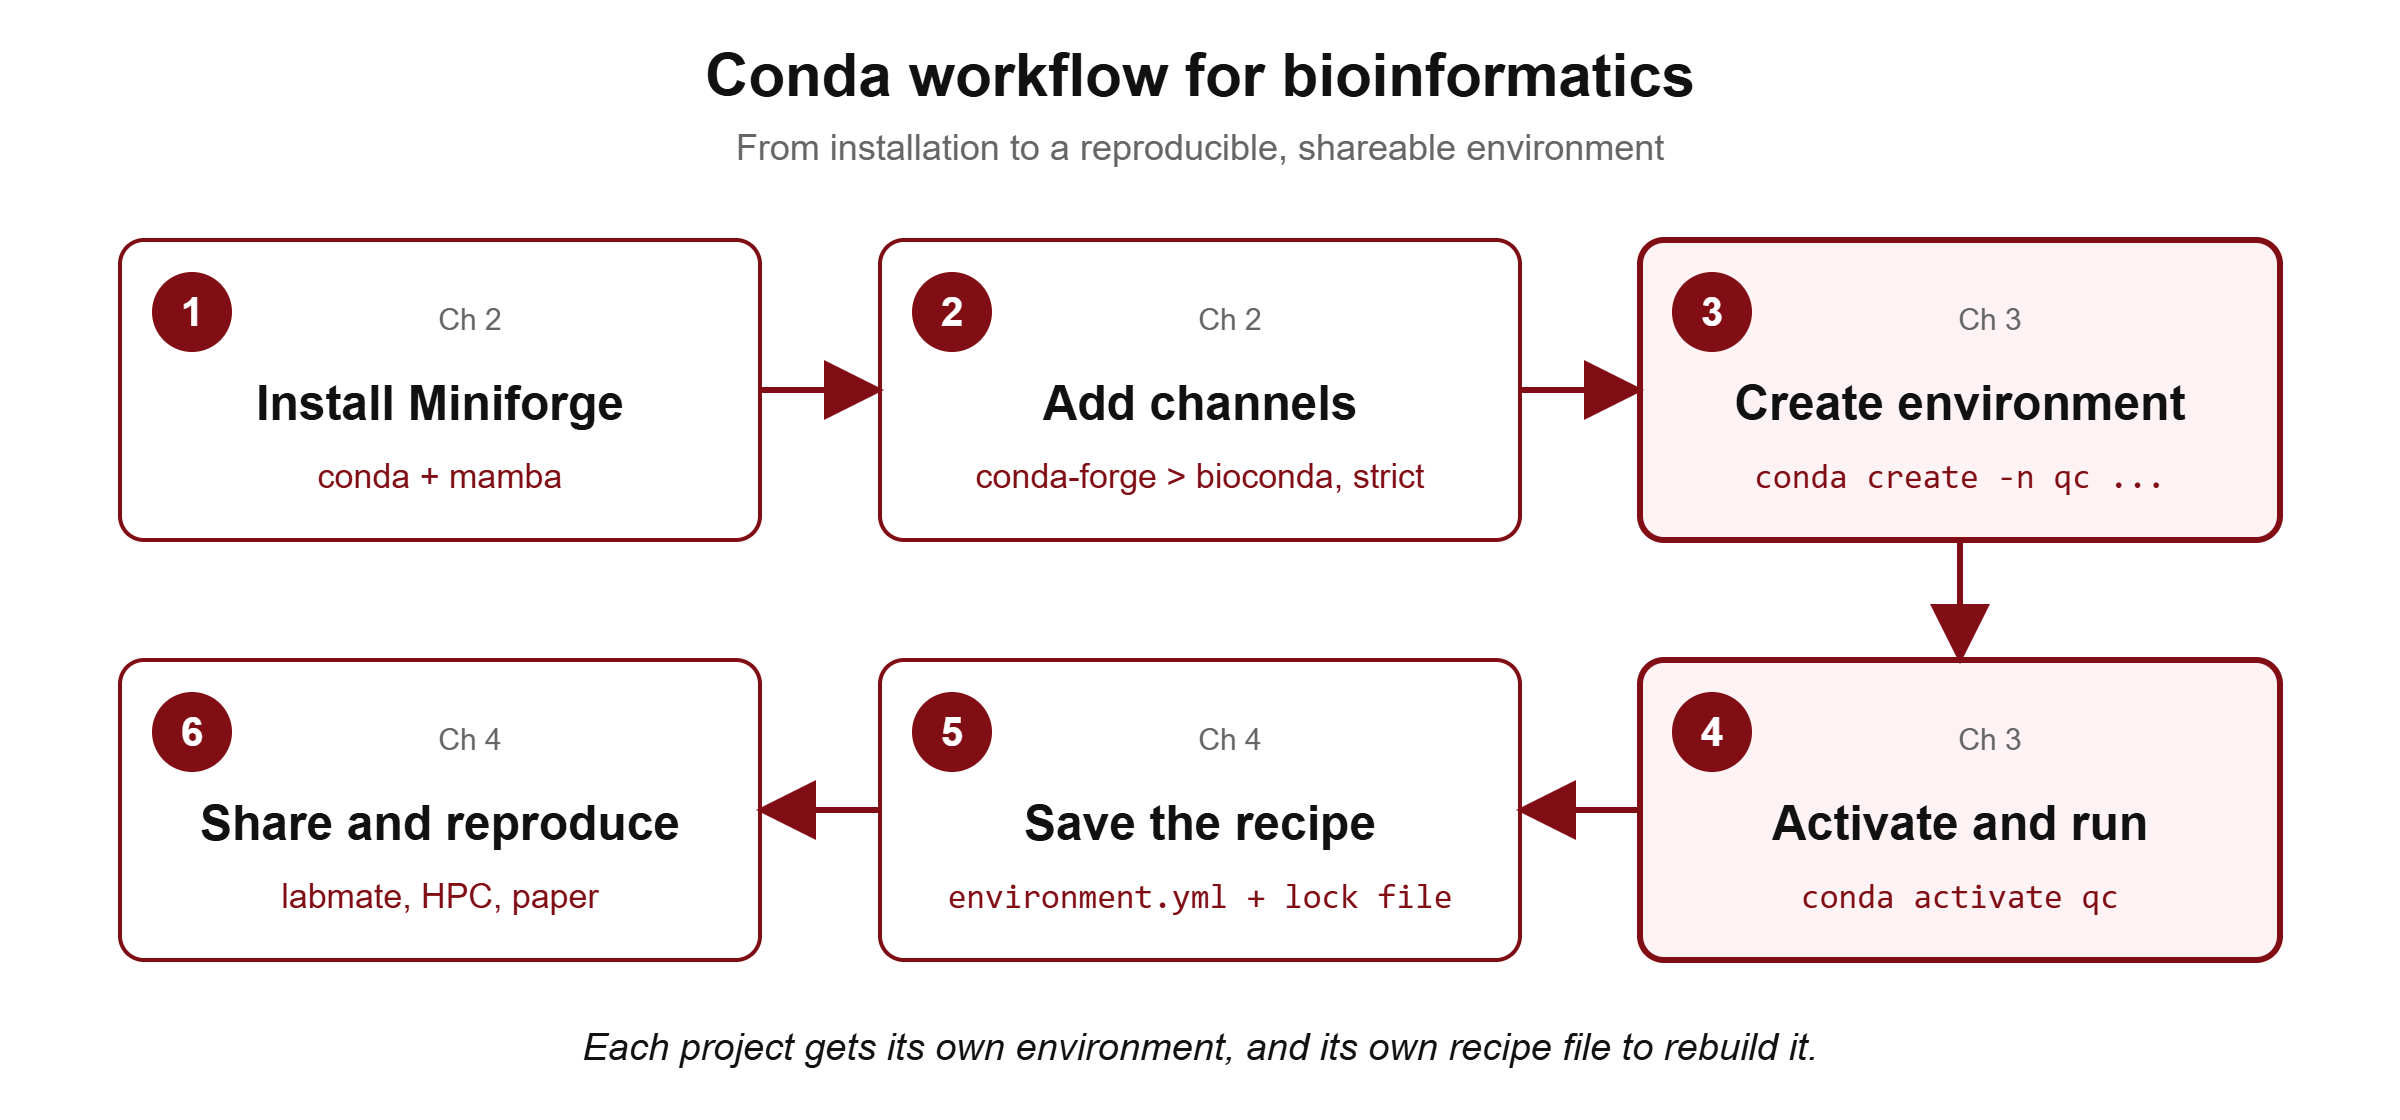
What you will learn in this Bioconda tutorial
- What a package manager, a package, a channel and an environment are, in plain words
- The difference between Anaconda, Miniconda, Miniforge, conda, mamba, micromamba and Pixi
- How to install Miniforge on Linux, WSL2 (Windows) and macOS, including Apple Silicon
- How to set up the Bioconda channels correctly, and why the order matters
- How to create, activate, update, list and delete environments
- How to pin tool versions and search for packages
- How the dependency solver works, and what to do when it fails
- How to share an environment as
environment.yml, an explicit lock file or a container, and how to write it in your Methods
Why it matters
A bioinformatics tool is rarely a single program. FastQC needs Java. MultiQC needs Python and dozens of Python libraries. Samtools needs compression libraries such as zlib and htslib. Each of these dependencies has its own version, and tools often need different versions of the same thing.
If you install everything into one place, sooner or later two tools will want different versions of the same library. One of them breaks. Worse, it may not break loudly. A tool can run with a slightly different library and give slightly different numbers. In research this matters: your results must be reproducible, and the exact software versions are part of your method.
Conda solves three problems at once. It installs tools without admin rights (perfect for a university HPC). It isolates tools into environments so they cannot break each other. And it records exact versions so you can rebuild the same setup on another machine, years later.
🔬 Researcher notes: reproducibility is a publication requirement, not a nice-to-have
In “Ten simple rules for reproducible computational research”, Sandve and colleagues list archiving the exact versions of all external programs as one of the core rules (Sandve et al., 2013). Grüning and colleagues argue for a layered approach: package managers such as conda for installing software, containers for freezing the operating system, and workflow managers to tie the steps together (Grüning et al., 2018, Cell Systems). Bioconda itself was described in Nature Methods in 2018 (Grüning et al., 2018). Cite it when you use Bioconda packages.
Many journals now ask for software versions and code availability. An exported environment file in your GitHub or Zenodo repository answers both questions in one go.
Core concepts in plain words
Learn these five words now. Every later command uses them.
| Term | Plain meaning | Example |
|---|---|---|
| Package manager | A program that downloads, installs, updates and removes software for you, including all its dependencies | conda, mamba |
| Package | One ready-built piece of software in a compressed file, with a name, a version and a build string | samtools-1.21-h…_0.conda |
| Channel | An online shelf where packages are published | conda-forge, bioconda |
| Environment | A separate folder holding one set of packages, with its own bin/ folder of programs | ~/miniforge3/envs/qc |
| Solver | The part of conda that works out which versions of every package fit together | libmamba (default since conda 23.10) |
Think of it like a kitchen. Channels are shops. Packages are ingredients. An environment is one cooking pot. The solver is the cook who checks that the ingredients in one pot do not clash. You keep different dishes in different pots so the curry does not end up in the kheer.
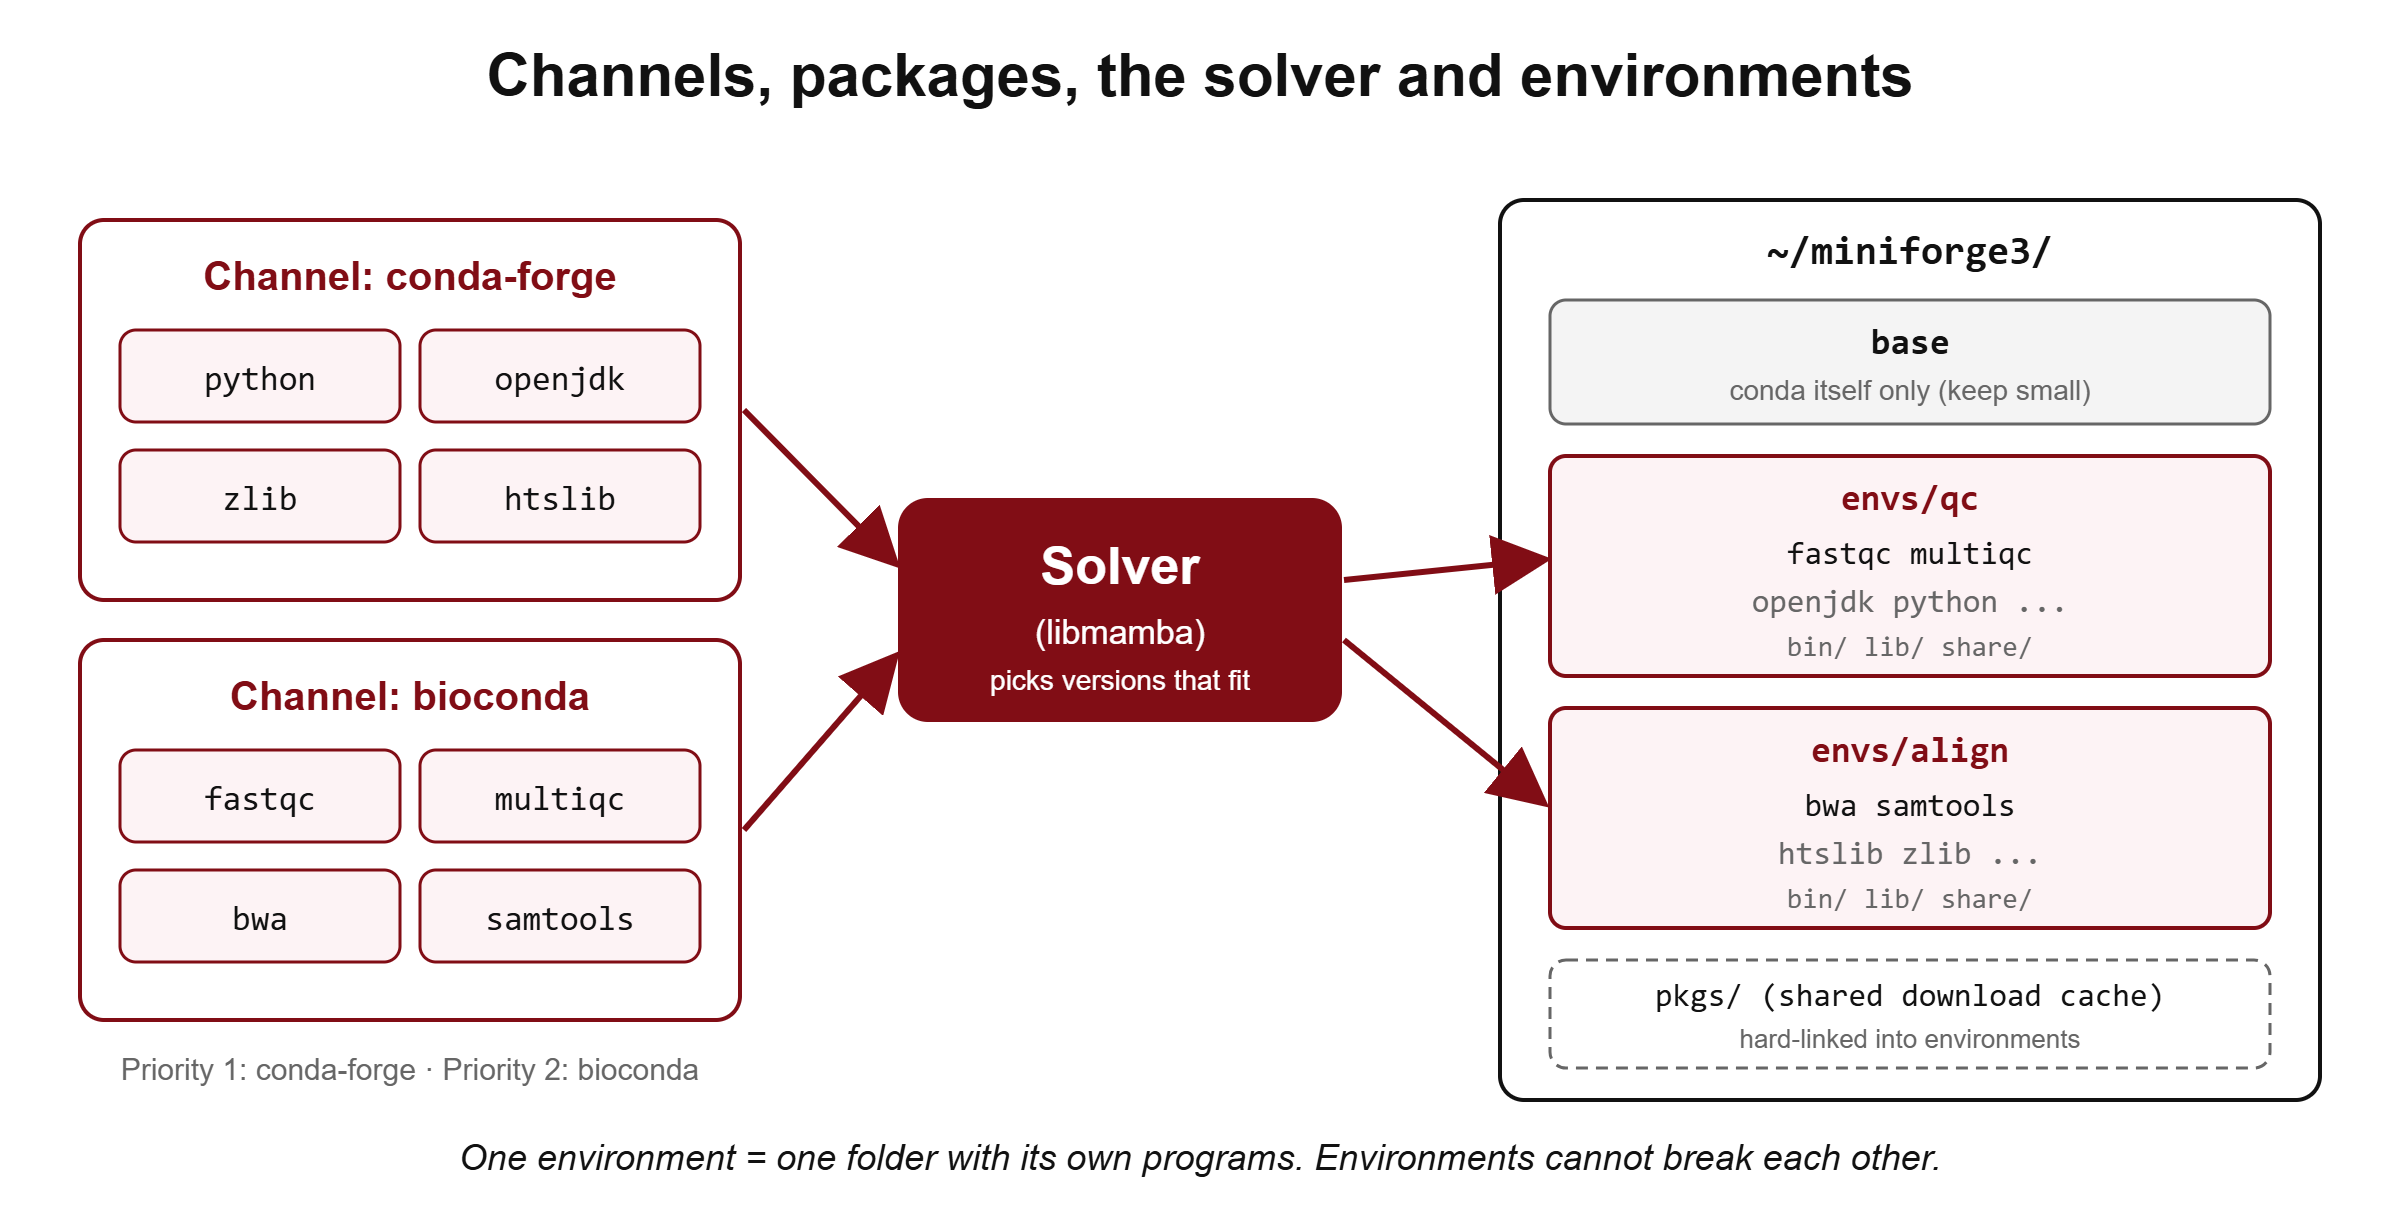
Conda, Bioconda and conda-forge: who does what?
- conda is the free, open-source package and environment manager. It works on Linux, macOS and Windows and handles any language: C, C++, Java, R, Python, Perl.
- conda-forge is a large community channel with general software: Python, R, compilers, compression libraries, Java and much more.
- Bioconda is a community channel built on top of conda-forge with thousands of bioinformatics tools: aligners, variant callers, QC tools, assemblers and R/Bioconductor packages. Bioconda packages depend heavily on conda-forge, so you always use both together.
- Miniforge is a small installer that gives you conda and mamba, already pointing to conda-forge.
Anaconda, Miniconda, Miniforge, mamba, Pixi: which one?
Students get confused by the names. Here is the honest summary.
| Name | What it is | Use it for this tutorial? |
|---|---|---|
| Anaconda Distribution | Large installer with hundreds of preinstalled packages; uses Anaconda’s defaults channel | No (big, and the defaults channel has licence terms for large organisations) |
| Miniconda | Small installer from Anaconda; also points to defaults | Works, but you must reconfigure channels |
| Miniforge | Small community installer with conda and mamba; points to conda-forge | Yes (recommended) |
| mamba | A fast, conda-compatible command (rewritten in C++ in version 2.0); comes with Miniforge | Optional; same commands as conda |
| micromamba | A single small binary version of mamba, popular in containers and CI | Advanced use |
| Pixi | A newer project-based tool for conda packages, with lock files built in | Optional; covered briefly in Chapter 4 |
▸ Go deeper: what is inside a conda package?
A conda package is just a compressed archive (.conda, or the older .tar.bz2). Inside are the files to install (for example bin/samtools, lib/libhts.so) and an info/ folder with metadata. The key metadata file is info/index.json: it lists the name, version, build string, platform and the dependencies with their allowed versions.
The file name tells you a lot: name-version-build.conda. The build string (for example h1234567_0) separates different builds of the same version, for example one built against a newer zlib. The final number is the build number, which goes up when the recipe is rebuilt without a version change.
Packages live in folders per platform, called subdirs: linux-64, linux-aarch64, osx-64, osx-arm64, win-64, plus noarch for packages that run anywhere (pure Python, Java, scripts). FastQC, for example, is a noarch package because it is Java.
▸ Go deeper: why not just use apt, pip or install.packages()?
sudo apt install needs admin rights, gives you one system-wide version, and the version is often old. You cannot have two versions side by side.
pip installs Python packages only. It cannot install a C library, Java or R, and it does not check that everything in the environment still fits together after an install. R’s install.packages() has the same limit for R.
Conda manages everything below your tool, down to the C libraries, and solves all dependencies together before installing anything. That is why it became the standard way to install bioinformatics software.
🔬 Researcher notes: the defaults channel and licensing
Conda itself is free and open source. Packages on conda-forge and Bioconda are free for everyone. Anaconda’s own defaults channel (repo.anaconda.com) is covered by Anaconda’s Terms of Service; under those terms, organisations with 200 or more employees may need a paid licence, with exemptions described by Anaconda for education. Rules change, so check Anaconda’s current terms if you work in a company or a large research institute. In August 2024 Bioconda removed defaults from its recommended setup. Using Miniforge with only conda-forge and Bioconda avoids the question completely.
Do not mix defaults and conda-forge in one environment. They build packages with different compilers and settings. Mixing them is a common cause of strange crashes and solver conflicts.
Quick check: Bioconda packages depend on which other channel?
conda-forge. Bioconda is built on top of conda-forge, so you always configure both, with conda-forge first (highest priority).