
Conda and Bioconda Tutorial: Install Bioinformatics Tools in Environments
Chapter 2 of 5: Installing Miniforge and setting up Bioconda
What you need
- A Linux or macOS terminal. On Windows, use WSL2 with Ubuntu (Bioconda does not build packages for native Windows). The Linux tutorial in this path shows how to set up WSL2.
- About 3–5 GB of free disk space for Miniforge and a few environments. Big environments (R with Bioconductor, deep learning) need more.
- An internet connection. No admin (sudo) rights are needed.
- Basic Linux commands:
cd,ls,cat. If these are new, do the Linux Command Line for Bioinformatics tutorial first.
| Platform | conda subdir | Bioconda support | Notes |
|---|---|---|---|
| Linux, Intel/AMD (most laptops, HPC) | linux-64 | Yes | The best-supported platform |
| Linux, ARM (AWS Graviton, some HPC) | linux-aarch64 | Yes | Most popular tools are built; a few older ones are missing |
| macOS, Intel | osx-64 | Yes | Fully supported |
| macOS, Apple Silicon (M1–M4) | osx-arm64 | Yes | Some older tools exist only for osx-64; see the Researcher notes below |
| Windows (native) | win-64 | No | Use WSL2 (Ubuntu) and follow the Linux steps |
Step 1: Download and run the Miniforge installer
Why: Miniforge gives you conda and mamba, already pointing to conda-forge, with no licence questions. You install it once, in your home folder.
Open your terminal (on Windows, open Ubuntu from WSL2) and run these two commands. The first downloads the right installer for your system; the second runs it.
curl -L -O "https://github.com/conda-forge/miniforge/releases/latest/download/Miniforge3-$(uname)-$(uname -m).sh"
bash Miniforge3-$(uname)-$(uname -m).sh
curl -L -O: download a file;-Lfollows the GitHub redirect,-Okeeps the original file name.$(uname): prints your system name (LinuxorDarwinfor macOS), so the right installer is picked.$(uname -m): prints your CPU type (x86_64,aarch64orarm64).bash Miniforge3-….sh: runs the installer script.
The installer asks three things. The exact wording changes between versions, but the answers do not:
- Licence: press
Enter, scroll withSpaceor pressq, then typeyes. - Install location: press
Enterto accept~/miniforge3(inside your home folder). - Initialize conda for your shell? Type
yes. This adds a few lines to your~/.bashrc(or~/.zshrcon macOS) so thecondacommand works in every new terminal.
Installation takes about 1–3 minutes. Now close the terminal and open a new one. You should see (base) at the start of your prompt.
Step 2: Check that conda works
conda --version
conda infoLook for three things: the platform (it should match your machine), the channel URLs (conda-forge, not repo.anaconda.com), and the envs directories (where your environments will live).
If you see conda: command not found, you answered “no” to the initialize question. Run this once, then open a new terminal:
~/miniforge3/bin/conda init bashOn macOS, replace bash with zsh.
▸ Go deeper: what does conda init actually change?
conda init adds a block between # >>> conda initialize >>> and # <<< conda initialize <<< to your shell start-up file. That block defines conda as a shell function, not just a program. This matters: a normal program cannot change the PATH of the shell that started it, but a shell function can. That is how conda activate is able to change your PATH.
By default the block also activates the base environment in every new terminal (the (base) in your prompt). Step 4 shows how to turn that off.
🔬 Researcher notes: installing on an HPC cluster
Install Miniforge in your own home or project folder; you do not need the admin team. Check your home quota first (quota -s or your cluster’s own command): environments and the package cache grow quickly. If home is small, move both to project storage with conda config --add envs_dirs /path/to/project/conda/envs and conda config --add pkgs_dirs /path/to/project/conda/pkgs. Do not put them on scratch storage that is purged automatically.
Run large installs on an interactive compute node if your site asks for it, because solving and extracting can be heavy on a shared login node. Some clusters provide a ready Miniforge module (module load …); ask before installing your own. If an older Anaconda module is present, avoid mixing it with your own Miniforge in the same shell.
Step 3: Add the Bioconda channels (run once)
Why: conda needs to know where to find bioinformatics tools and in which order to search the channels. These three commands come from the official Bioconda documentation. Run them exactly in this order.
conda config --add channels bioconda
conda config --add channels conda-forge
conda config --set channel_priority strict
conda config: changes your conda settings, saved in the file~/.condarc.--add channels bioconda: adds Bioconda to the top of your channel list.--add channels conda-forge: adds conda-forge above Bioconda.--addalways puts the new channel at the top, so you add the lowest-priority channel first.--set channel_priority strict: tells conda to take each package only from the highest-priority channel that has it.
Now check the result:
conda config --show channels
conda config --show channel_priorityconda-forge must be first and bioconda second. If you also see defaults in the list (common if you used Anaconda or Miniconda before), remove it:
conda config --remove channels defaults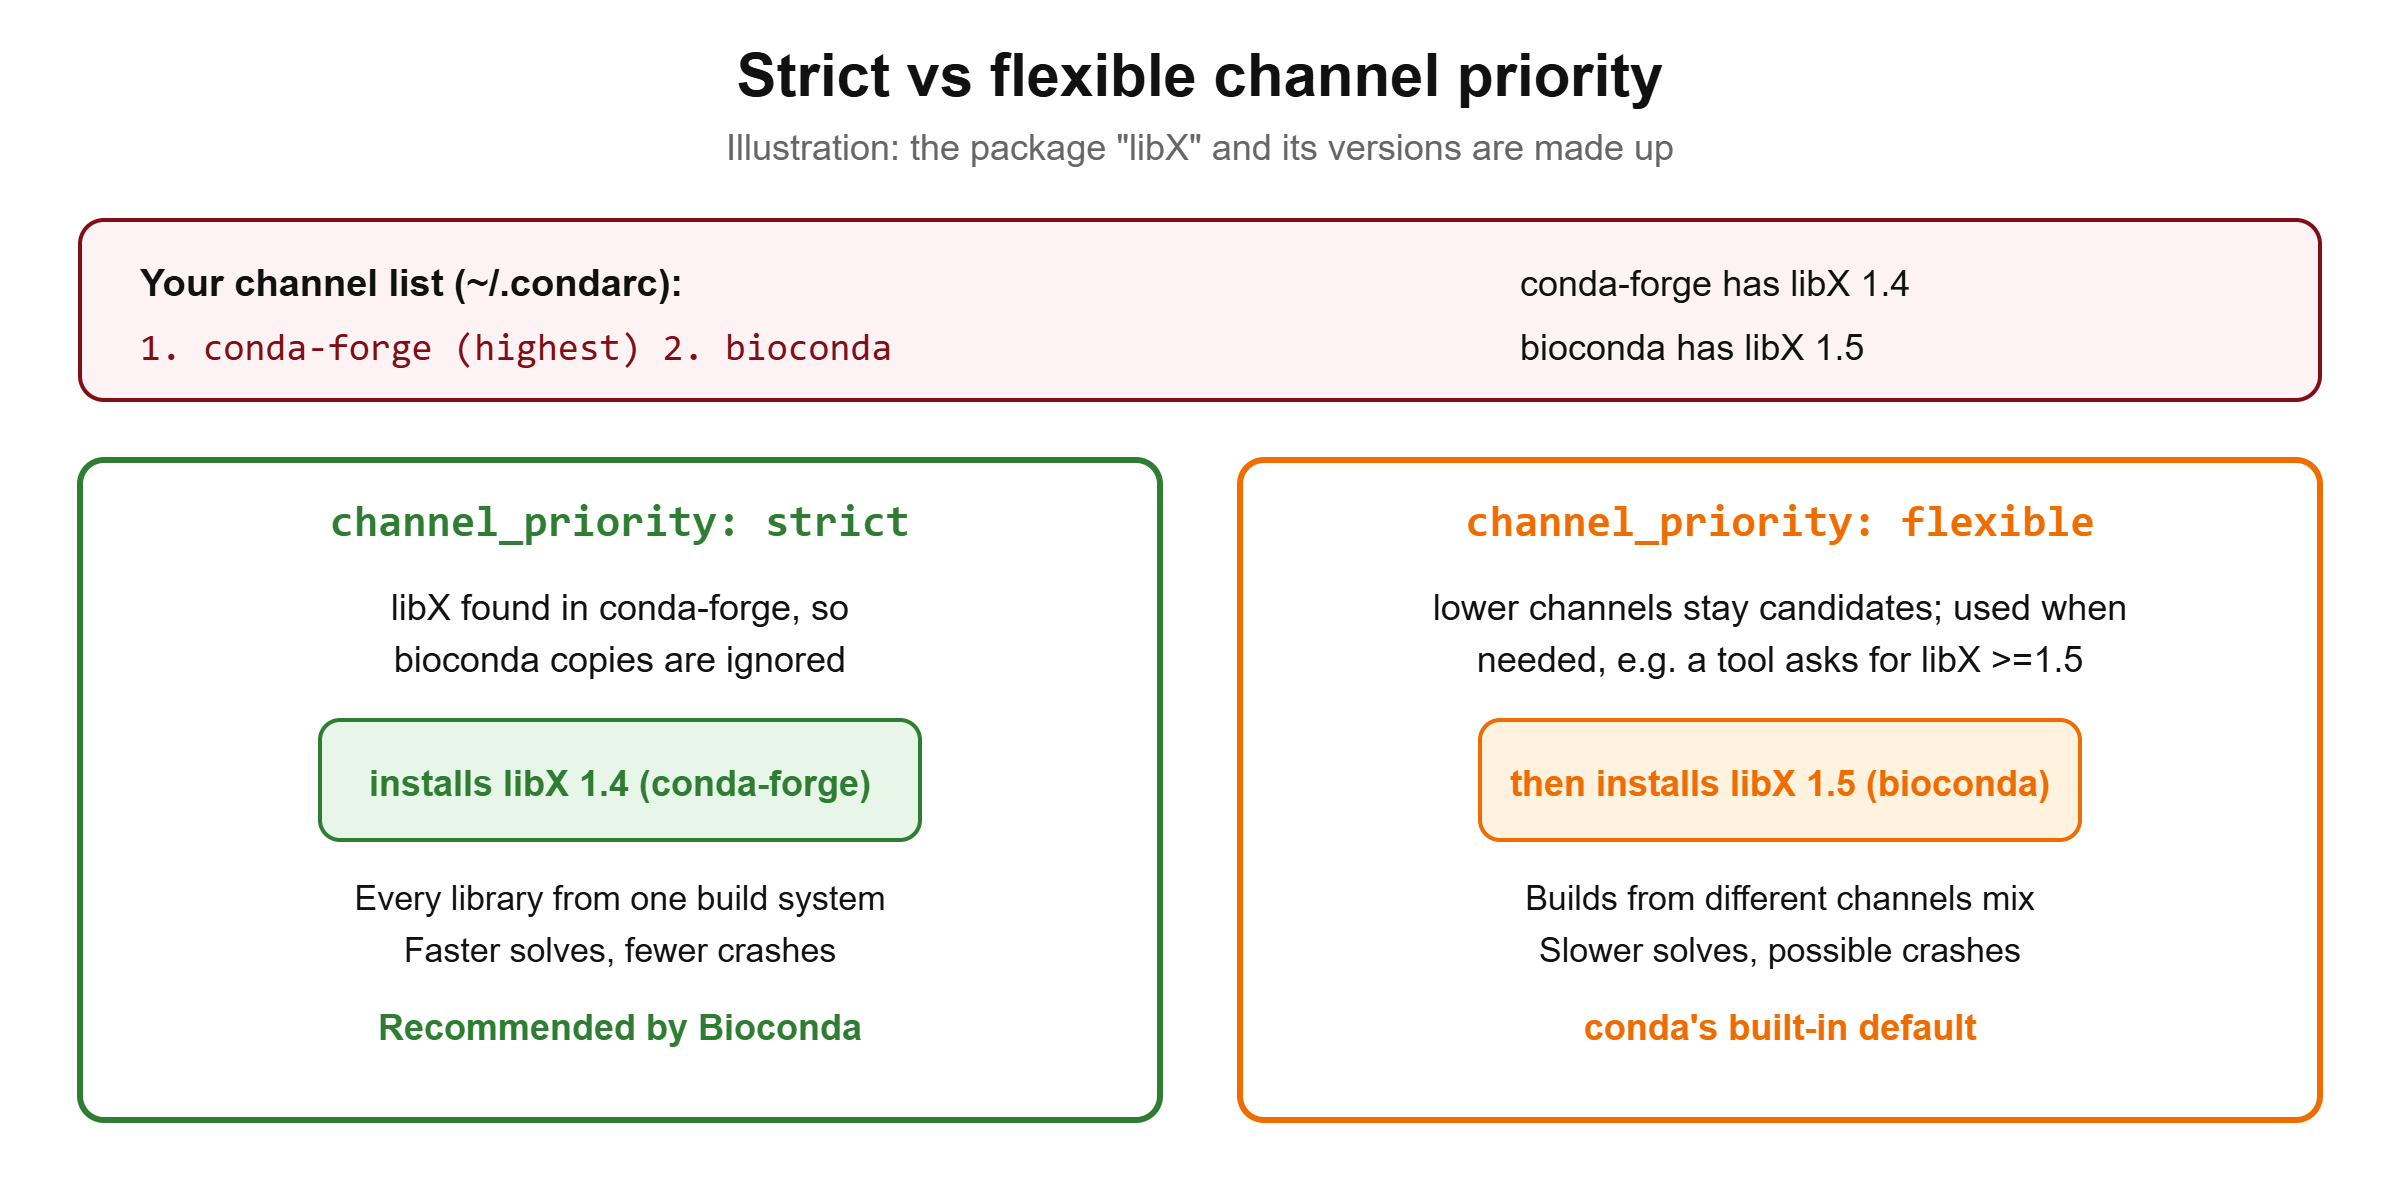
▸ Go deeper: strict vs flexible channel priority
With flexible priority (conda’s built-in default), conda prefers higher-priority channels but still takes a package from a lower-priority channel when that helps satisfy another requirement (for example, a tool that asks for a newer library version than conda-forge has). That sounds helpful, but it mixes builds made with different compilers and pinned libraries, which is a common cause of “it installed but crashes” and very slow solves.
With strict priority, once a package name is found in a higher-priority channel, all copies of that name in lower channels are ignored, even newer ones. The search space shrinks, solves are faster, and every library comes from one consistent build system. Here is the rule as pseudo-code:
# Strict channel priority (simplified)
for each package NAME the solver needs:
    for CHANNEL in channels, from highest to lowest priority:
        if CHANNEL has any build of NAME:
            candidates = builds of NAME in CHANNEL only
            stop searching lower channels for NAME
    pick the best candidate that satisfies all constraints
    (newest version first, then highest build number)

# Flexible priority: candidates come from ALL channels;
# higher channels are preferred, but a lower channel's build
# is used when it is needed to satisfy the other constraints.
The cost of strict priority: if conda-forge has an older version of a package that also exists in Bioconda, you get the conda-forge one. This is intended. Bioconda deliberately builds against conda-forge’s shared library versions so the two fit together.
▸ Go deeper: where conda reads its settings from
conda merges settings from several .condarc files. The main ones, from broad to narrow: the system file inside your installation (~/miniforge3/.condarc, where Miniforge sets conda-forge), your user file (~/.condarc, where the commands above write), and an optional per-environment file (<env>/.condarc, written with conda config --env). Environment variables (CONDA_CHANNEL_PRIORITY and so on) and command-line flags override files.
To see which file sets what, run conda config --show-sources. This one command solves most “why is conda still using defaults?” mysteries.
No permission to change your settings? On a shared machine you can pass the same choices on every command instead. On the command line, channels are listed from highest to lowest priority, the opposite of conda config --add:
conda create -n qc fastqc multiqc --channel conda-forge --channel bioconda --strict-channel-priorityStep 4 (optional): Stop base from activating in every terminal
Why: base is where conda itself lives. If it is always active, you may install tools into it by accident. A small, clean base is the most common advice in the conda and Bioconda documentation.
conda config --set auto_activate falseOlder conda versions call this setting auto_activate_base. If conda says the key is unknown, run conda config --set auto_activate_base false instead. You can still type conda activate to enter base when you need it.
| Setting | conda’s default | Recommended here | What it controls |
|---|---|---|---|
channels | conda-forge (Miniforge) | conda-forge, bioconda | Where packages come from, in priority order |
channel_priority | flexible | strict | Whether lower channels can override higher ones |
solver | libmamba (conda 23.10 and later) | libmamba | The dependency solver |
auto_activate | true | false | Activating base in every new shell |
envs_dirs | ~/miniforge3/envs | Default, or project storage on HPC | Where environments are created |
pkgs_dirs | ~/miniforge3/pkgs | Default, or project storage on HPC | The shared download cache |
Defaults are from the conda documentation and change only rarely. Check yours with conda config --show.
🔬 Researcher notes: Apple Silicon (M1–M4)
Bioconda now builds for osx-arm64, and most popular tools are available natively. If an older tool has only an Intel (osx-64) build, you can create one Intel environment that runs under Rosetta 2:
CONDA_SUBDIR=osx-64 conda create -n oldtool sometool
conda activate oldtool
conda config --env --set subdir osx-64
The last line saves the choice inside that environment so later installs also use Intel builds. Use this only when needed, because Intel builds run slower under emulation. sometool here is a placeholder for the tool you need.
Old HPC operating systems. conda detects your system’s C library version as a virtual package (__glibc, shown in conda info). New builds may need a newer glibc than an old cluster OS has, and the solver then refuses them. That is correct behaviour: the package would not run. Ask your admins about a newer OS, or use a container (Chapter 4).