
Conda and Bioconda Tutorial: Install Bioinformatics Tools in Environments
Chapter 4 of 5: The solver, environment files and reproducibility
How the solver decides
When you ask for fastqc multiqc, conda does not just download two files. It must choose one version of every package in the environment (often 100+) so that every dependency rule is satisfied at the same time. This is a hard logic puzzle, and the part of conda that solves it is the solver. Since conda 23.10 the default solver is libmamba, built on the fast libsolv library; before that, conda used a slower “classic” solver.
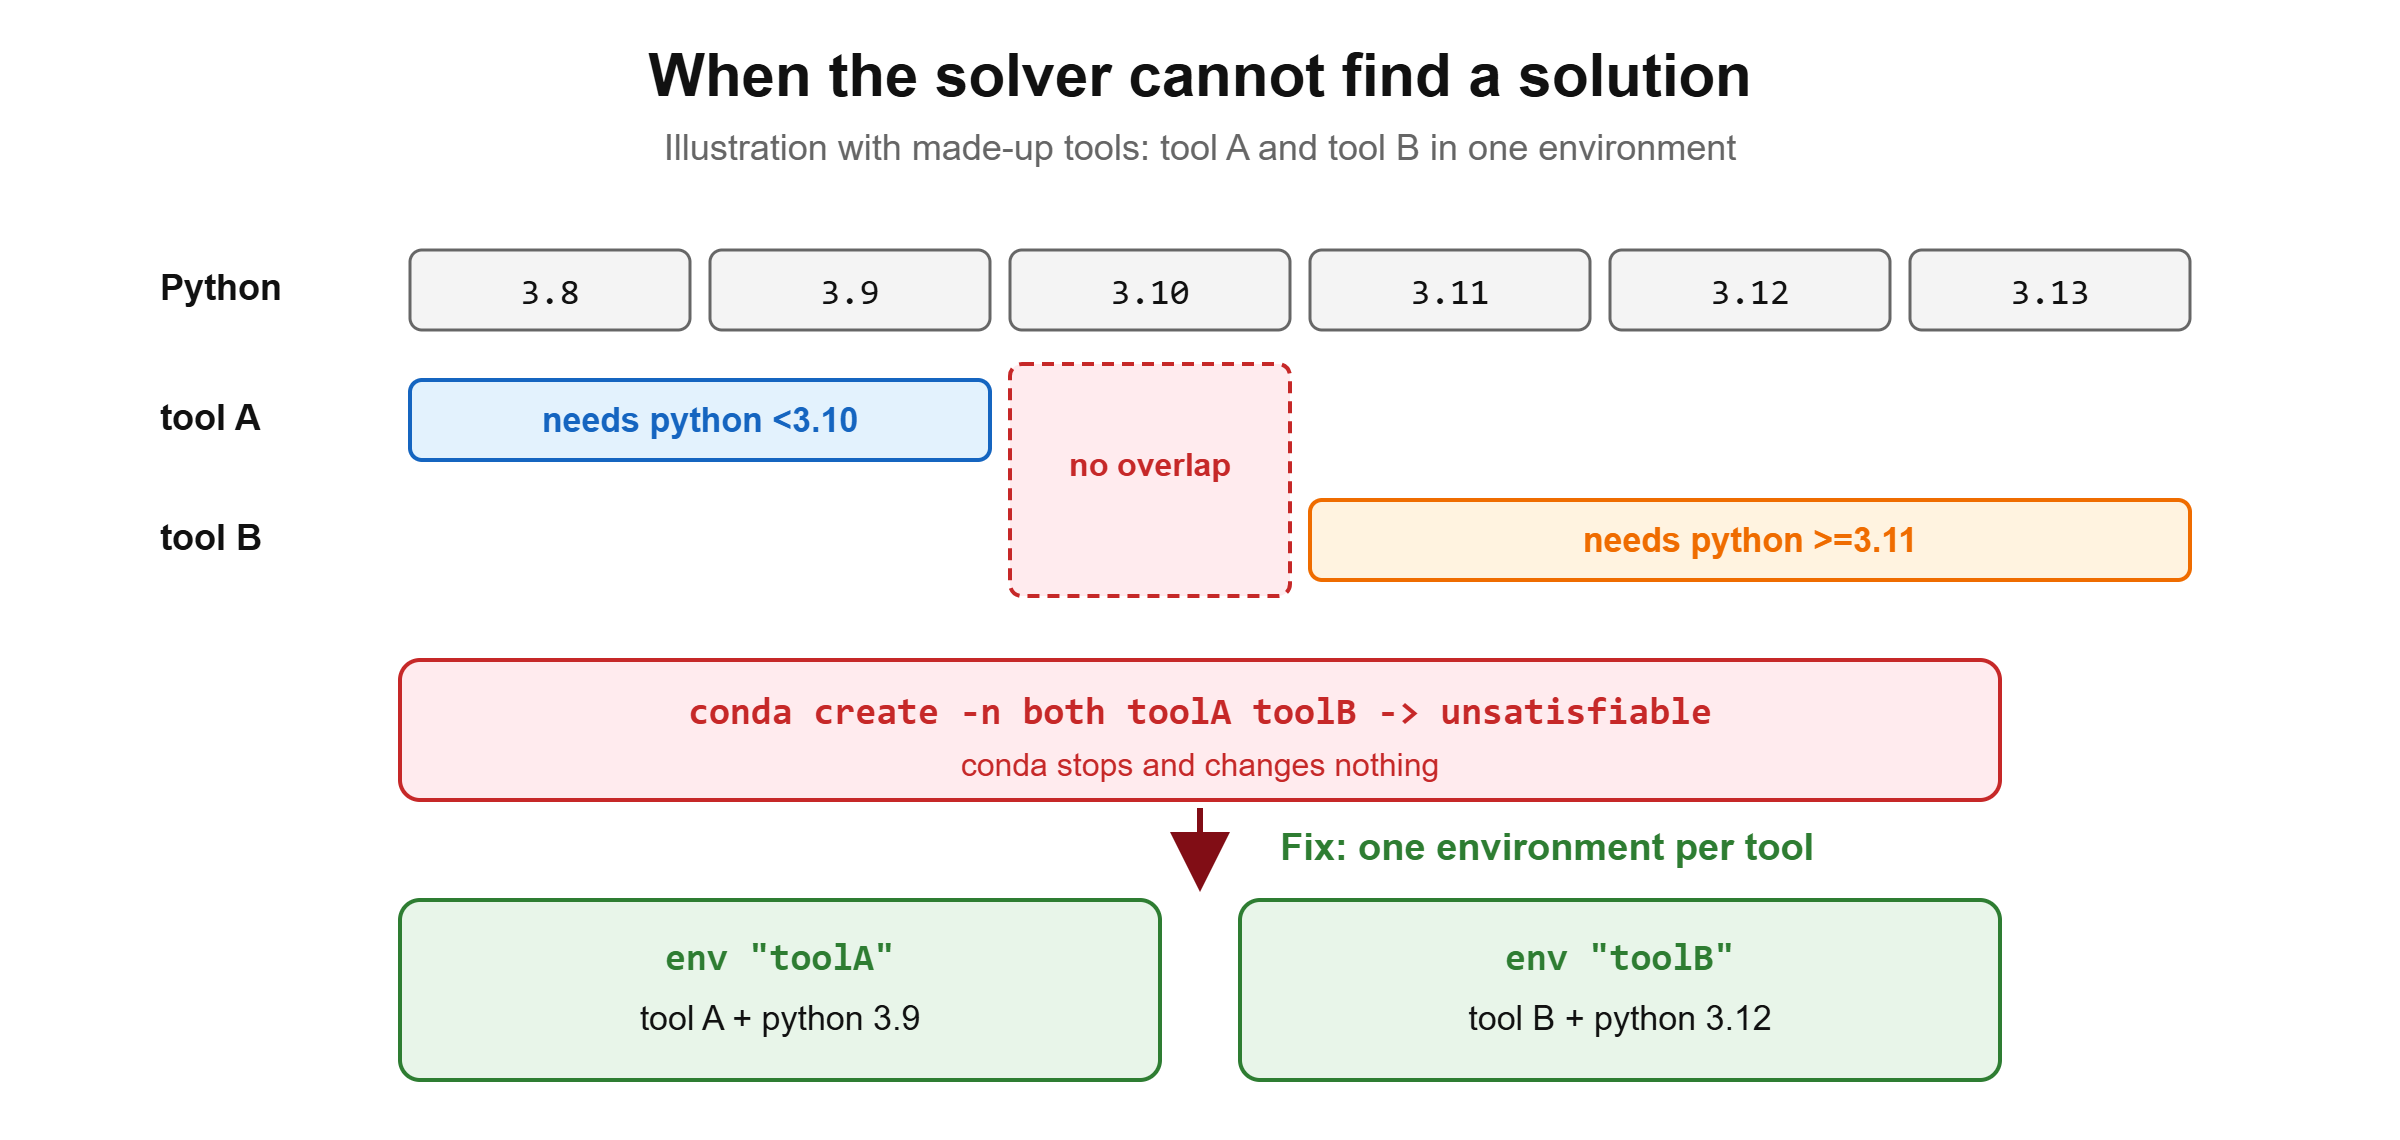
When no combination fits, conda stops before changing anything and prints a conflict report such as LibMambaUnsatisfiableError. That is a feature: a broken environment is worse than no environment. The usual fix is to split the tools into two environments, or relax a pin.
▸ Go deeper: the solver as a logic (SAT) problem
The solver turns your request into a satisfiability (SAT) problem. Every available package build becomes a true/false variable: “install python 3.12.7 build X?”. The rules become logical clauses:
# Simplified dependency solving
VARIABLES: one boolean per candidate build (from channels + subdir)
CLAUSES:
  request:      at least one build of fastqc AND of multiqc
  one-version:  at most one build of each package name
  dependencies: if build B is chosen -> one of B's allowed deps is chosen
  system:       respect virtual packages (__glibc, __osx, __cuda ...)
  pins:         respect pinned and already-installed specs
SOLVE: find an assignment where every clause is true
OPTIMISE (in order): channel priority -> newest versions ->
                     highest build numbers -> fewest packages changed
if no assignment exists:
    report the chain of conflicting requirements; change nothing
In general this problem is NP-complete, which is why a huge environment with many pins can take a long time to solve. Strict channel priority helps because it removes most candidates before the search starts.
▸ Go deeper: mamba, micromamba and Pixi
mamba started as a faster drop-in replacement for conda. Since conda 23.10 uses the same libmamba solver, you no longer need mamba just for speed, but it is included in Miniforge and is still pleasant to use. Commands are the same: mamba create -n qc fastqc multiqc. Mamba 2.0 was rewritten fully in C++ and no longer depends on conda’s Python code.
micromamba is a single static binary with no base environment, popular in Docker images and CI. Pixi uses the same conda packages but works per project: pixi init, then pixi add samtools, and it always writes a lock file. Bioconda’s documentation describes setting it up with pixi config set default-channels '["conda-forge", "bioconda"]'. Learn conda first; the ideas transfer directly.
Step 10: Write an environment file
Why: typing install commands from memory is not reproducible. An environment.yml file is a short text recipe for an environment. You keep it in your project folder (and in Git), and anyone can rebuild the environment from it with one command.
Create a file called environment.yml with any text editor (for example nano environment.yml) and write:
name: align
channels:
  - conda-forge
  - bioconda
  - nodefaults
dependencies:
  - bwa=0.7.18
  - samtools=1.21
- fastpname:the environment name used by default.channels:in priority order, highest first.nodefaultsis a special entry that stops conda adding thedefaultschannel from someone else’s settings.dependencies:one package per line, with optional version specs as in the pinning table. Pin the tools whose numbers appear in your results; leave libraries free.
The versions above are examples. Check what is current with conda search bwa before you pin. Now build the environment from the file:
conda env create -f environment.yml
conda activate align
After editing the file (for example adding a tool), bring the environment up to date:
conda env update -f environment.yml --prune-f: the file to read.--prune: also remove packages that are no longer listed, so the environment matches the file exactly.
If you need a Python package that exists only on PyPI, install it through the same file so that conda knows about it. Put pip in the list and add a pip: block at the end. Use this as a last resort; prefer conda packages:
dependencies:
  - python=3.12
  - pip
  - pip:
- some-pypi-only-package(some-pypi-only-package is a placeholder for the real name.)
🔬 Researcher notes: why pin even “small” tools
New releases sometimes change default parameters, filters or output formats, not only fix bugs. Two runs of the “same” pipeline a few months apart can therefore differ if versions were left free. Pin every tool whose output feeds your results, record the exact versions from conda list, and update deliberately at the start of a project (then re-run everything), not halfway through. If you must update mid-project, note the change and re-run the affected steps.
Step 11: Export an environment you already built
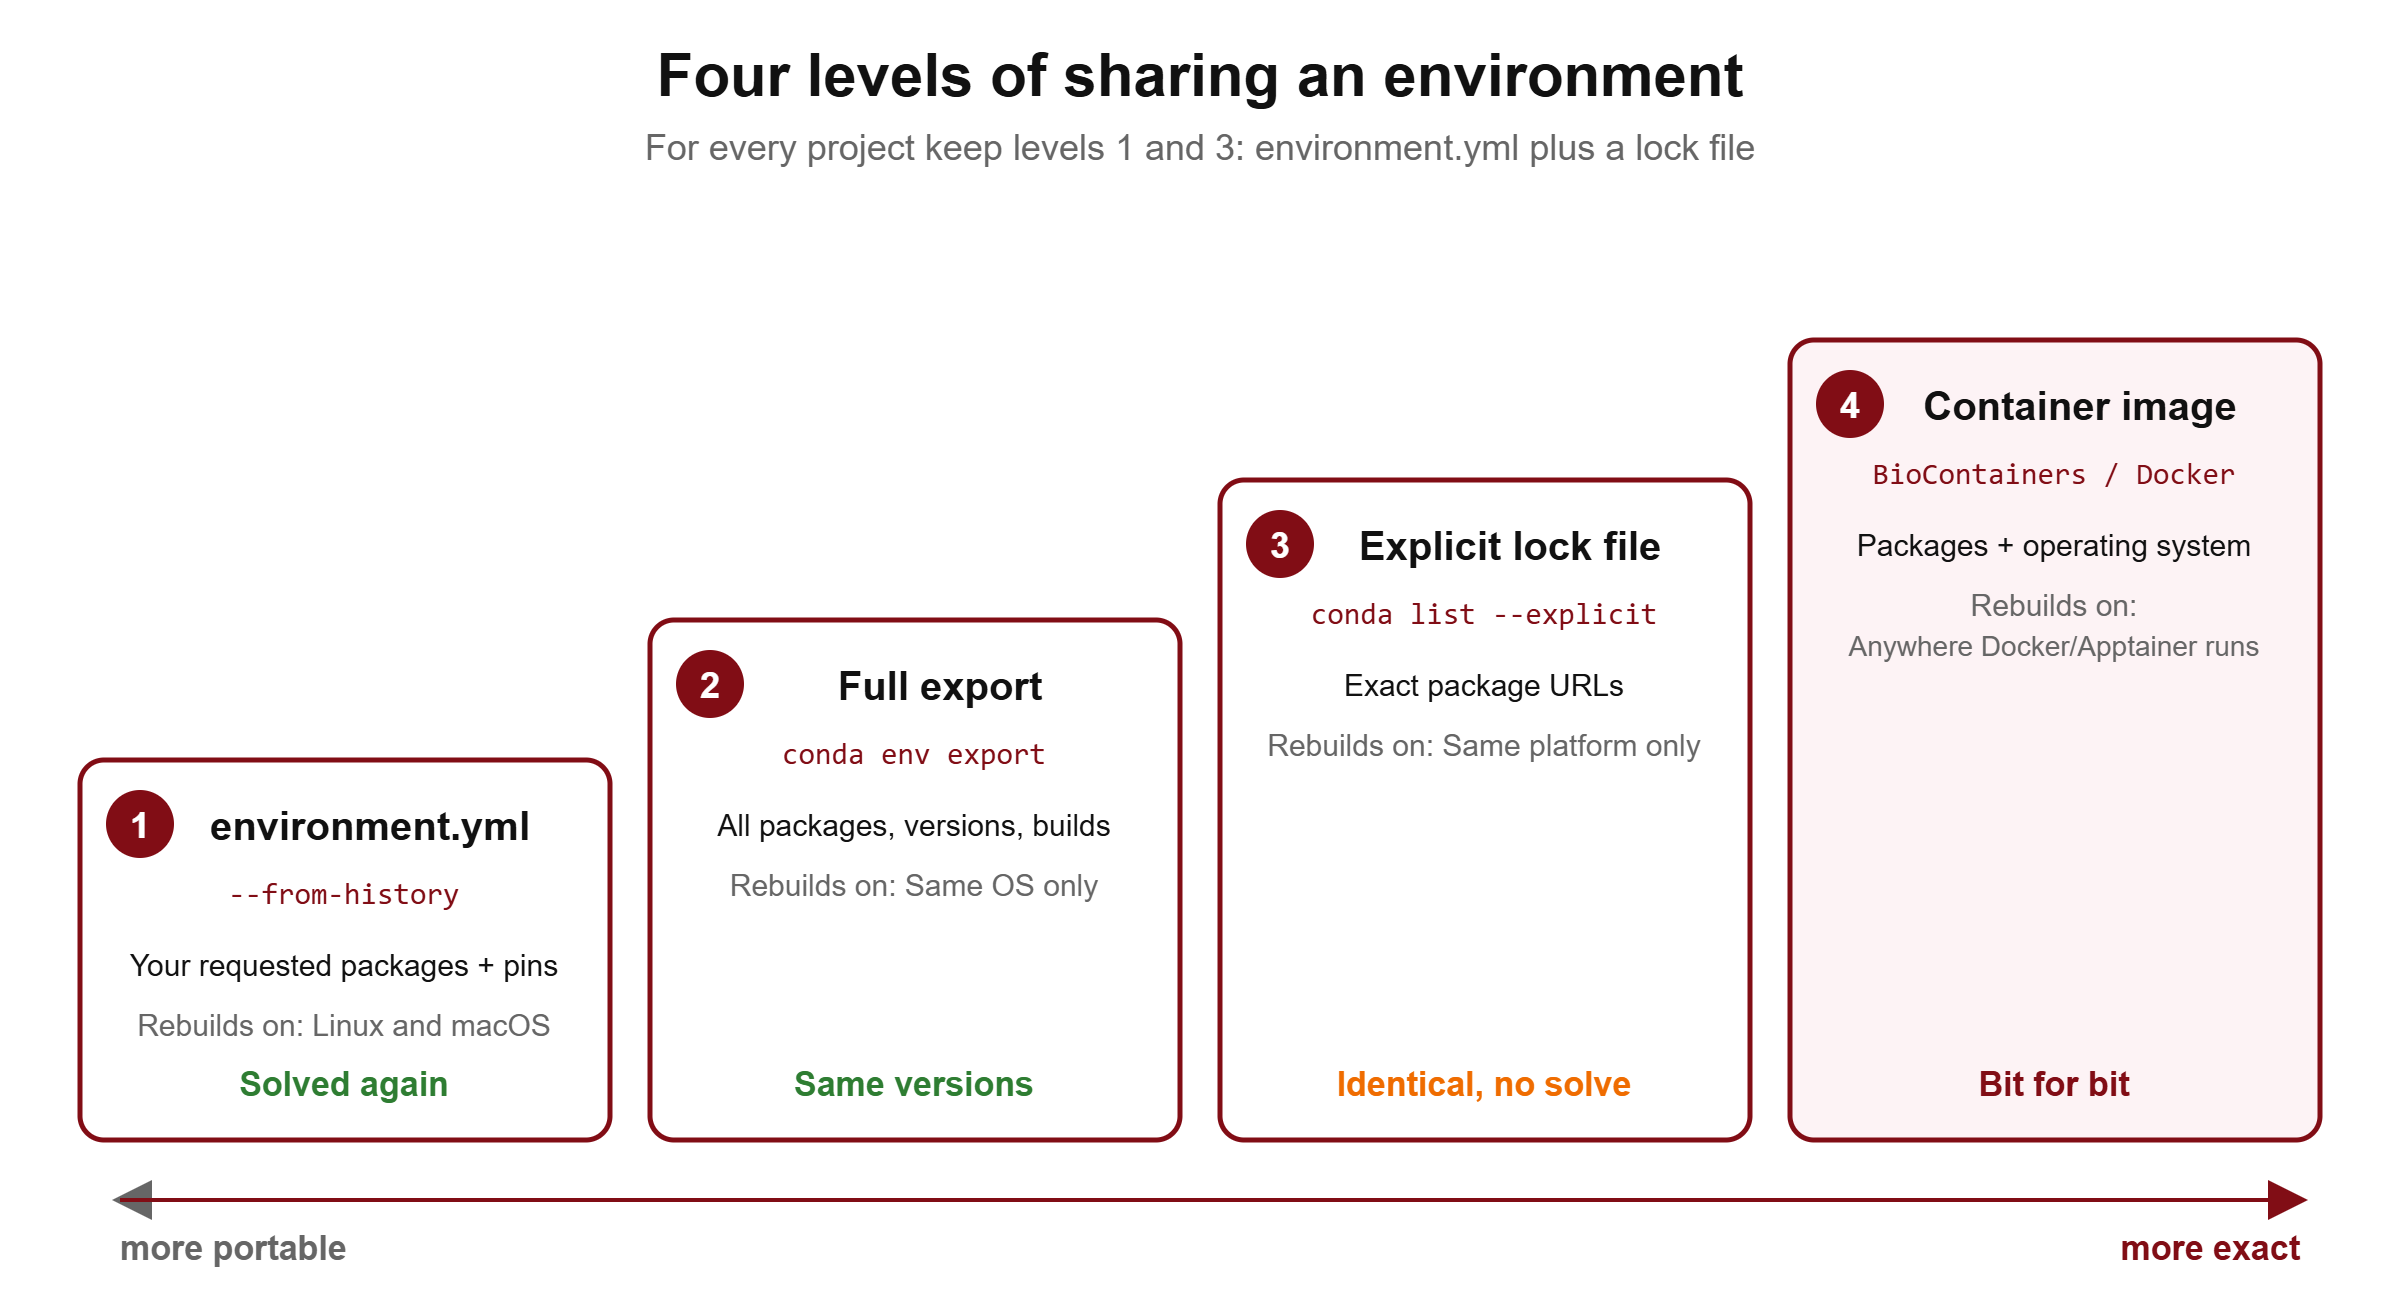
If you installed things interactively, you can turn the environment into a file afterwards. There are three useful kinds of export, from most portable to most exact:
conda env export -n qc --from-history > environment.yml   # only what you asked for
conda env export -n qc --no-builds > environment-full.yml # every package + version
conda list -n qc --explicit > explicit-linux-64.txt # exact download URLs (a lock file)| Export | Contains | Rebuilds on other OS? | Exactly the same packages? |
|---|---|---|---|
--from-history | Only the packages you requested, with the pins you typed | Yes (Linux ↔ macOS) | No: dependencies are solved again |
--no-builds | All packages with versions, no build strings | Often, but some packages are OS-specific | Close: same versions where they exist |
Full conda env export | All packages with versions and build strings | Usually no | Yes on the same platform |
--explicit lock file | Exact package URLs, in install order | No: one file per platform | Yes, without solving at all |
| Container image | The packages plus the operating system | Yes (anywhere Docker/Apptainer runs) | Yes, bit for bit |
Recreate from an explicit file with conda create -n qc-copy --file explicit-linux-64.txt. Recent conda versions also have a newer conda export command with a --format option (for example conda export --format=explicit); the commands above keep working.
Best practice: commit both environment.yml (from history, human-readable, portable) and an explicit lock file for the platform where you ran the analysis.
▸ Go deeper: why the full export is not portable
A full export lists everything conda installed, including low-level, platform-specific packages such as Linux’s libgcc or _openmp_mutex, with build strings that exist only for that platform. A Mac user who tries to create it gets “packages not found”. The --from-history export lists only your requests, so the solver can pick the right low-level packages for each platform.
The flip side: from-history files are solved again on the day someone uses them, so unpinned packages may come out newer. That is why you pin the scientifically important tools in the file and keep an explicit lock file for exact reruns. Tools such as conda-lock and Pixi go one step further and write one lock file that covers several platforms.
▸ Go deeper: undo with revisions
conda keeps a history of every change to an environment. conda list -n qc --revisions shows numbered revisions with what was added or removed. conda install -n qc --revision 2 tries to roll back to revision 2. It cannot bring back packages that were deleted from the cache and are no longer online, so it does not replace an environment file, but it is a useful “undo” after an accidental update.
Step 12: Use conda inside workflow managers and containers
Real pipelines rarely activate environments by hand. Workflow managers create them for you from small files, one per step:
- Snakemake: add
conda: "envs/qc.yaml"to a rule and run withsnakemake --use-conda(newer versions also accept--software-deployment-method conda). Snakemake builds and caches one environment per YAML file. - Nextflow / nf-core: a process can declare
conda 'bioconda::fastqc=0.12.1'; nf-core pipelines are run with-profile conda,-profile dockeror-profile singularity. - BioContainers: for every Bioconda package, a Docker image is built automatically and published at
quay.io/biocontainers, and Singularity/Apptainer copies are served fromdepot.galaxyproject.org/singularity. Image tags look like<version>--<build>; look up the exact tag for your tool on quay.io before you pull it.
The Reproducible Pipelines with Nextflow, Snakemake, Docker and HPC course covers these tools in depth.
🔬 Researcher notes: choosing the right level of reproducibility
For coursework, an environment.yml is enough. For a thesis chapter or paper, add an explicit lock file and record the platform. For a pipeline others will run on clusters, use containers (BioContainers, or images built from your lock file), because containers also freeze the operating system libraries that conda deliberately leaves to the host, such as glibc. On HPC, Apptainer (formerly Singularity) runs these images without root (Kurtzer et al., 2017). This layered model (package manager → container → workflow manager) is exactly the one recommended by Grüning et al. (2018, Cell Systems) and used by nf-core (Ewels et al., 2020).
Archive the files. Put environment.yml, the lock file and your workflow in a public repository and archive a release on Zenodo to get a DOI. Reviewers can then rebuild your software without asking you.
🔬 Researcher notes: how to write it in your Methods
A template you can adapt (replace the versions with those from conda list):
“All software was installed with conda (v25.x, Miniforge distribution) from the conda-forge and Bioconda channels (Grüning et al., 2018) using strict channel priority. Read quality was assessed with FastQC v0.12.1 and summarised with MultiQC v1.x (Ewels et al., 2016). Reads were aligned with BWA-MEM v0.7.18 (Li, 2013) and processed with SAMtools v1.21 (Danecek et al., 2021). The conda environment files (environment.yml) and explicit lock files for linux-64 are available at [repository URL / Zenodo DOI].”
State the operating system and platform (for example Ubuntu 22.04, linux-64) when you share a lock file, because lock files are platform-specific.
Quick check: a colleague on a Mac needs your Linux environment. Which file do you send?
The --from-history environment.yml (with your key tools pinned). The full export and the explicit lock file contain Linux-only builds and will not solve on macOS. If you need identical packages on every platform, use a container instead.