
Conda and Bioconda Tutorial: Install Bioinformatics Tools in Environments
Chapter 3 of 5: Creating and using environments
Now the useful part. In this chapter you will build an environment called qc with FastQC and MultiQC (the tools of the next tutorial in this path), use it, change it and delete it safely.
Step 5: Create your first environment
conda create -n qc fastqc multiqcconda create: make a new, empty environment and install packages into it.-n qc: the environment name (--name). Use short, meaningful names:qc,align,rnaseq,proj-wheat-2026.fastqc multiqc: the packages to install. You can list many in one command, and you should: one solve is faster and more reliable than many small installs.
conda first shows its plan and asks before changing anything:
Read the plan before typing y. Each line shows channel/subdir::name-version-build. Check that the bioinformatics tools come from bioconda and their dependencies from conda-forge. Notice that conda added Java (openjdk) for FastQC and Python for MultiQC automatically. Press y and Enter. Downloading and installing takes about 1–5 minutes, depending on your internet.
Add -y to skip the question in scripts: conda create -n qc -y fastqc multiqc.
Step 6: Activate the environment and run a tool
conda activate qc
which fastqc
fastqc --version
multiqc --versionThree signs that it worked: the prompt now starts with (qc); which fastqc points inside envs/qc/bin/; and the version commands answer. When you are done, leave the environment:
conda deactivateRemember: every new terminal starts outside your environment. Activate it again each time with conda activate qc. Forgetting this is the number one cause of “command not found” in the next tutorials.
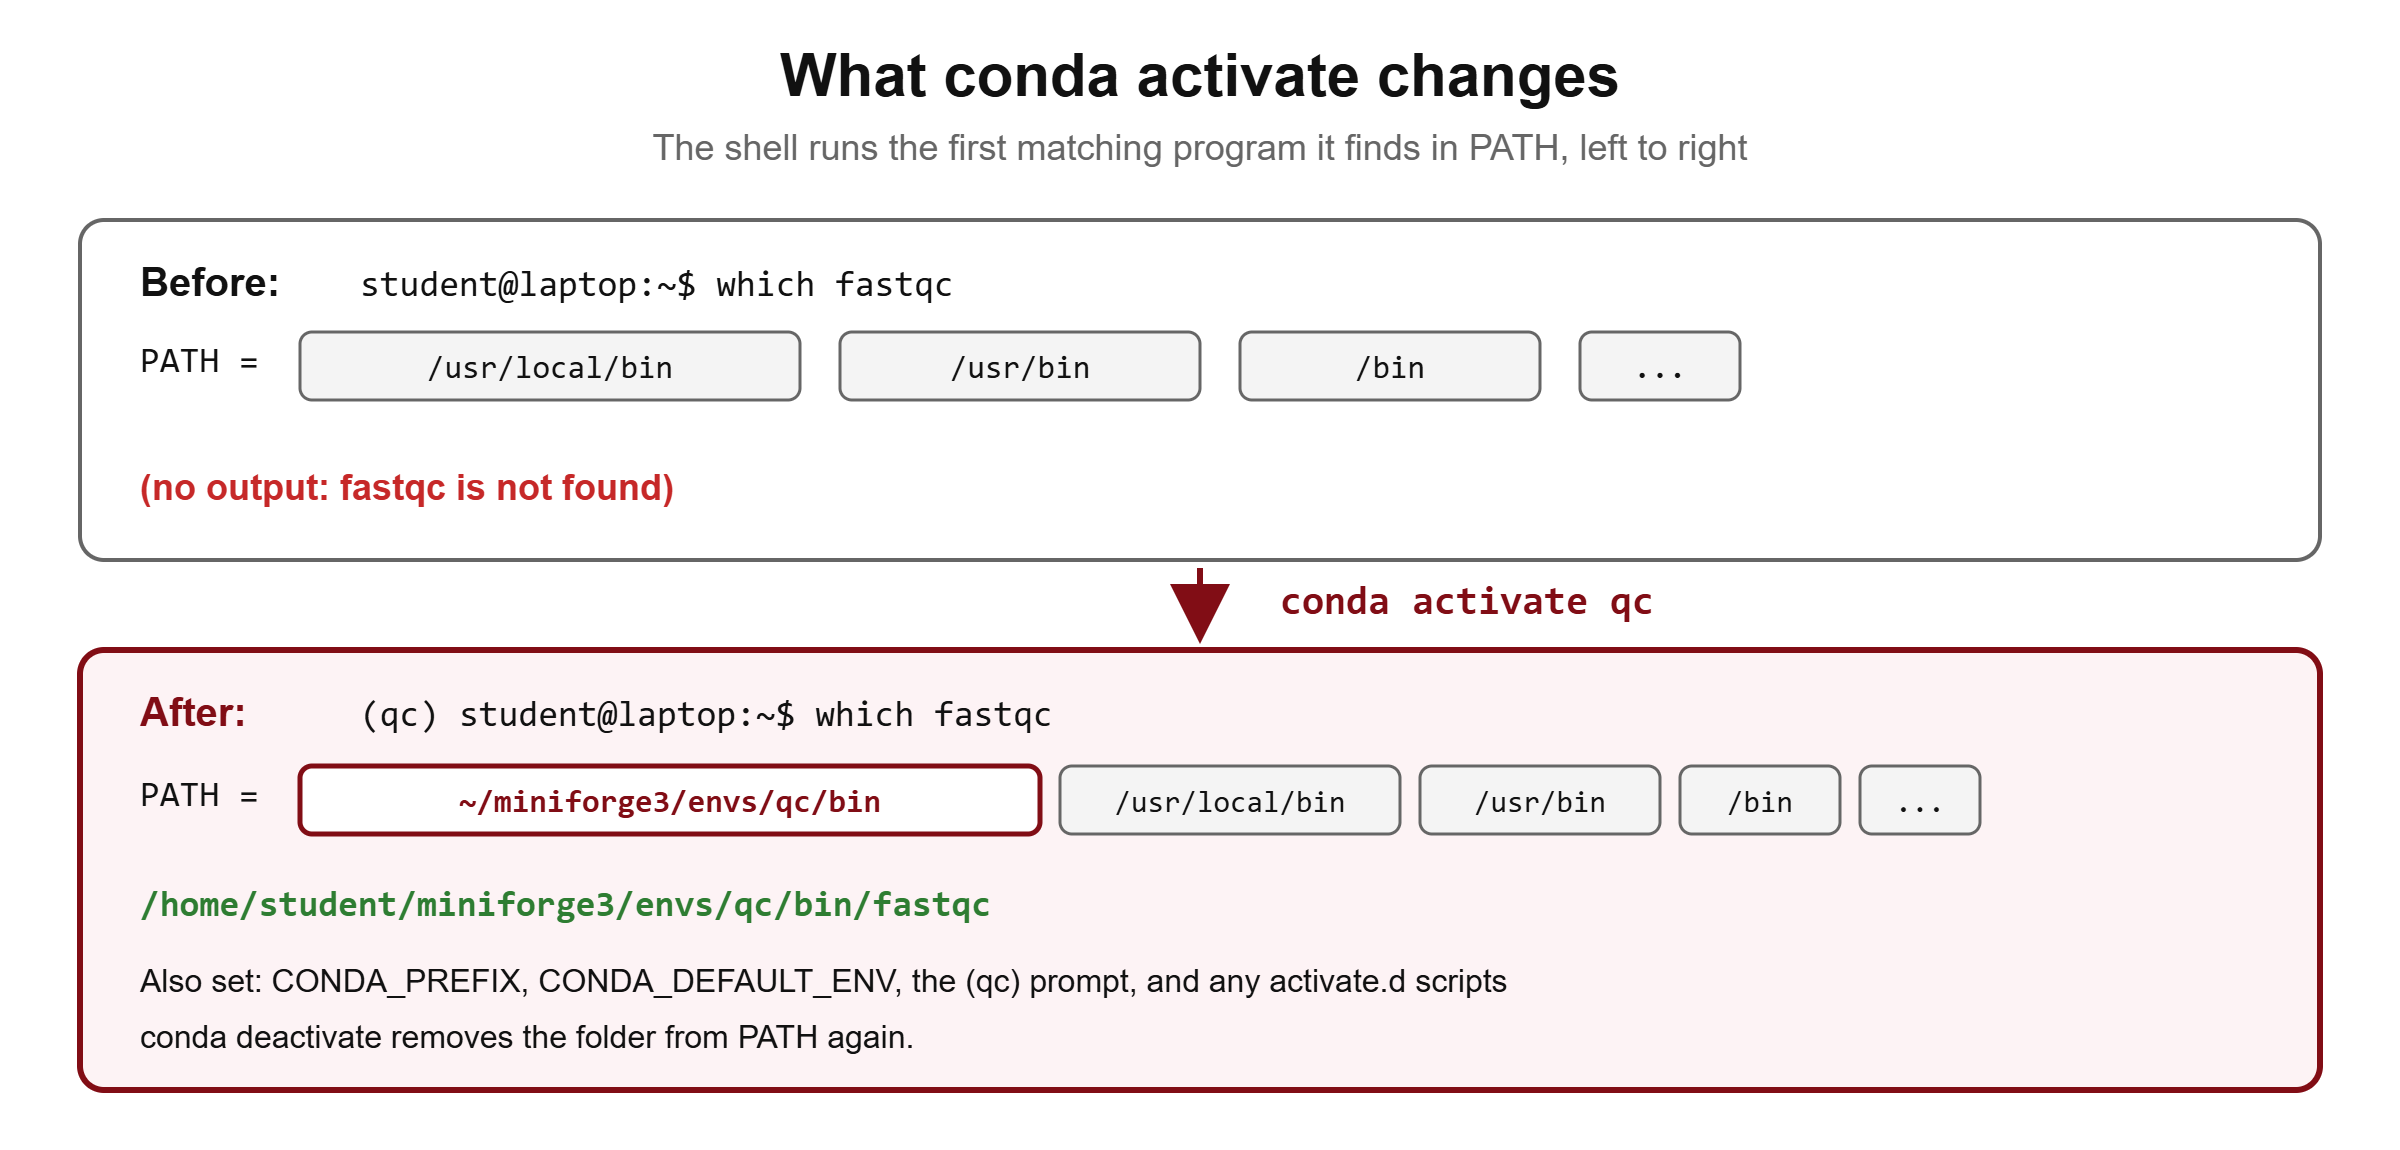
▸ Go deeper: what activation really does
An environment is just a folder, for example ~/miniforge3/envs/qc, with its own bin/, lib/ and share/. When you type a command, the shell looks through the folders in your PATH variable from left to right and runs the first match. Activation puts the environment’s bin/ at the front of PATH:
# conda activate qc (simplified)
if another environment is active:
    run its etc/conda/deactivate.d/ scripts
    remove its bin/ folder from PATH
PATH = "<prefix>/bin:" + PATH          # prefix = ~/miniforge3/envs/qc
CONDA_PREFIX = "<prefix>"
CONDA_DEFAULT_ENV = "qc"
run every script in <prefix>/etc/conda/activate.d/
PS1 = "(qc) " + PS1                    # the prompt change you see
Some packages ship activation scripts. Java packages set JAVA_HOME, and some R or GDAL packages set data paths. That is why you should activate an environment rather than calling ~/miniforge3/envs/qc/bin/fastqc by its full path: the full path skips those scripts.
Check it yourself with echo $PATH and echo $CONDA_PREFIX before and after activation.
Step 7: List, inspect and change environments
These are the commands you will use every week.
conda env list                      # all environments; * marks the active one
conda list -n qc                    # every package in qc, with version, build and channel
conda list -n qc fastqc             # just one package
conda install -n qc samtools        # add a tool to qc
conda update -n qc fastqc           # update one tool (within what the solver allows)
conda remove -n qc samtools # remove a tool-n qctargets an environment by name, so you do not need to activate it first. Without-n, commands act on the active environment.conda listoutput has four columns: Name, Version, Build, Channel. The Channel column is the quickest way to check that nothing came fromdefaults.conda update --all -n qcupdates everything in the environment. Do this at the start of a project, never in the middle of an analysis.
To run one command in an environment without activating it (handy in scripts and job files):
conda run -n qc fastqc --versionStep 8: Find packages and pin versions
Before installing, check that a tool exists and which versions are available:
conda search samtools
conda search "samtools>=1.20"
The output lists every available version and build, with the channel. You can also search on the web at bioconda.github.io (each tool has a recipe page) or anaconda.org/bioconda. Note that the conda package name is not always the program name. For example, the blast package provides blastn, blastp and friends.
To fix a version, add it to the package name. This is called pinning:
| You write | conda installs | Use it when |
|---|---|---|
samtools | The newest version that fits | Exploring, first install |
samtools=1.21 | Any 1.21.x (1.21, 1.21.1 …) | You want a release line but accept bug-fix updates |
samtools==1.21 | Exactly 1.21 | You must match a paper or a previous run |
"samtools>=1.20,<1.22" | Any version in that range | You need a feature added in 1.20 |
bioconda::samtools | samtools taken from Bioconda only | Forcing a channel for one package |
samtools=1.21=h…_0 | One exact build | Rarely; build strings differ between platforms |
Put quotes around specs that contain >, < or |, otherwise the shell treats them as redirection or pipes.
▸ Go deeper: fuzzy = versus exact ==
In conda’s match specification (“MatchSpec”) syntax, a single = is fuzzy: samtools=1.21 means “1.21 or anything starting with 1.21.”, like 1.21.*. A double == is exact. Many students write = thinking it is exact and are surprised when a 1.21.1 build appears. For a Methods section, record the exact version that was installed (from conda list), not the spec you typed.
Avoid pinning build strings in files you share. The same version has different build strings on Linux and macOS, so a build-pinned file fails to solve on another platform. The Bioconda FAQ gives the same advice.
Step 9: Remove, rename or clone an environment
conda deactivate                    # you cannot delete the environment you are in
conda env remove -n qc              # delete the environment and its folder
conda rename -n qc qc-old           # rename (recent conda versions)
conda create -n qc2 --clone qc      # copy an environment
Deleting an environment does not touch your data. It only removes the software folder. Never delete or move environment folders by hand with rm or mv; use these commands so conda’s records stay correct.
▸ Go deeper: why you cannot just move an environment folder
When conda installs a package, it replaces a long placeholder path written into the package’s text and binary files with your real environment path (this is called prefix replacement). Scripts start with lines like #!/home/student/miniforge3/envs/qc/bin/python. Move the folder and those paths point to nowhere. To move an environment, export it and create it again, or use --clone.
▸ Go deeper: why ten environments do not take ten times the space
conda downloads each package once into the package cache (pkgs_dirs) and extracts it there. When an environment needs that package, conda creates hard links from the cache into the environment instead of copying the files, as long as both are on the same file system. A hard link is a second name for the same data on disk, so roughly:
disk used ≈ size(package cache) + small per-environment overhead
not         number of environments × size of each environment
Tools like du may count hard-linked files in every folder, which is why environments look bigger than they really are. To free space, run conda clean --all: it removes cached packages that no environment uses, old tarballs and index caches. Add --dry-run first to see what would go.
How many environments should I make?
The short answer: one environment per project or per pipeline step, never everything in base. Use this table as a guide.
| Situation | Suggested layout | Why |
|---|---|---|
| Learning / one tool | One small environment per tool (fastqc, bwa) | Fast solves, nothing to conflict |
| A pipeline (QC → align → call) | One environment per step (qc, align, varcall) | Steps often need incompatible versions |
| A thesis or paper project | One environment per project, saved as environment.yml in the project folder | The file travels with the analysis |
| R / Bioconductor analysis | A separate R environment (r-base, bioconductor-deseq2 …) | R stacks are large and slow to solve |
| Jupyter notebooks | One environment with JupyterLab; register other environments as kernels | Avoid installing Jupyter everywhere |
| Snakemake / Nextflow pipelines | Let the workflow manager create one environment per rule or process | Built-in, reproducible per step (Chapter 4) |
🔬 Researcher notes: why small environments win
The solver’s work grows quickly with the number of packages and constraints, so one huge “bioinfo” environment becomes slow to solve and eventually impossible to update. The Bioconda FAQ recommends keeping base small and using smaller, single-purpose environments, and creating an environment with all its packages in one command rather than adding packages one by one. Production pipelines follow the same idea: nf-core runs each process in its own container built from Bioconda packages, and Snakemake creates a separate conda environment per rule from a small YAML file.
Report versions per step. If your QC and alignment steps run in different environments, report the versions from each one. conda list -n align bwa samtools gives you the exact numbers to copy into your Methods.
🔬 Researcher notes: R and Bioconductor through conda
Bioconda packages Bioconductor libraries with a bioconductor- prefix (for example bioconductor-deseq2), and conda-forge packages CRAN libraries with an r- prefix (for example r-ggplot2). Put R itself (r-base) and all R packages in one dedicated environment, created in a single command. Avoid calling install.packages() or BiocManager::install() inside a conda R environment: those compile packages against whatever is on the system and conda no longer knows they exist, which breaks reproducibility and can break later solves.
Bioconductor releases are tied to specific R versions, so the solver will choose an R version that matches the Bioconductor packages you request. If you need an older Bioconductor release to match a paper, pin the Bioconductor package versions and let the solver pick R.
Quick check: you activated qc, but which fastqc prints /home/student/miniforge3/bin/fastqc. What happened?
FastQC was installed into base, not into qc (the path has no envs/qc/). Remove it from base with conda remove -n base fastqc and install it into qc with conda install -n qc fastqc. This is exactly why a small base, not auto-activated, is recommended.